Once you have a Facebook Business Page it is very easy to add custom tabs below your cover image to display your other social media accounts and blog. You can also set up a custom page with anything you want on it such as a landing page to promote something for free with an opt-in box. Essentially it is just a web page of your choice copied across into your Facebook Page. You can set up contests and even have a shop in your page.
All of these items are added using Facebook Apps.
Here is a simple 2 Step Process of how to add them to your page.
Step 1
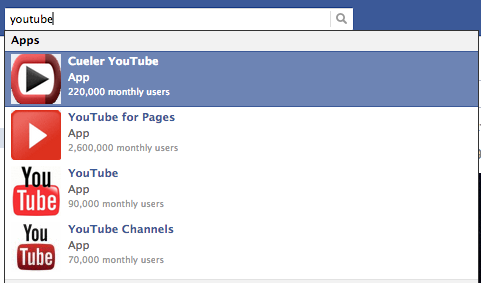
You seek out an app that you want to add by typing in the subject in the top search bar in Facebook. In this case we have used Youtube. Just make sure you choose one of the options that display under apps and not pages. Then visit that app and you can add it to your page from there.

We recommend this app for adding actual web pages to your tabs “Static HTML: iframe tabs”. Just type that in the Facebook search box to find it and add it to your page. This video shows you how to set up a webpage from within your Facebook page using that app.
Since Facebook changed their setup a while back you can no longer choose a page as a default landing page to your visitors. However, the rest of the instructions in that video work.
We love these apps by Involver. In a couple of clicks you can pull through your Youtube channel and other social media accounts.
To run a contest from within your page check out Promotions from Widlfire. Remember, you can only run a contest in Facebook through a third-party app.
Step 2
Make sure the new apps you added are displaying on your page.
If you have added an app and it is not showing up, then following these instructions:
- Go to your page and click “update info” on the drop-down menu that appears under “edit page” in the top right.
- Then choose “apps”. Click on “edit settings” next to any apps that are not showing up and then “add” in the profile tab that pops up.
Now that you have all of your apps showing up, you can format them.
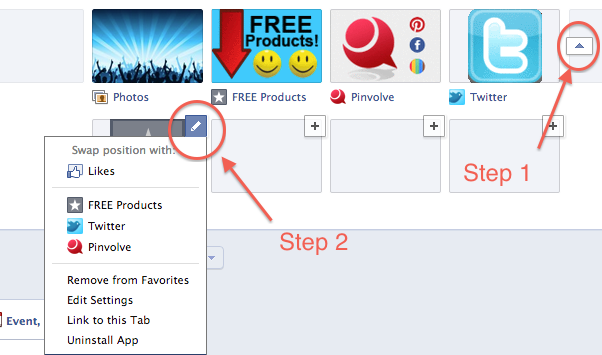
Just click on the far right arrow to the right of your tabs (see image below), then the pencil next to the one you want to edit. You can swap it with others for better positioning, remove it when you don’t want it or even choose “edit settings” to rename it or set a custom image. In the example below we chose a custom image and renamed our page “FREE Products”.

If you want to set up a custom image and aren’t a graphical whiz then you can get FREE custom images by clicking the banner below.
